

As an application user, you are responsible for tracking the number of hours that you work on specific tasks. Tracking work time using timesheets allows companies to plan budgets for complex projects, track the allocation of resources, implement charge codes, and so on. Therefore, your manager may ask you to track the hours you spend on specific tasks for specific projects. Depending on the policy of your company, your manager may also want you to track the hours you spend on tasks under various charge codes and input methods. As an application user, you track your working hours, using timesheets.
For more information about how projects are managed using CA Clarity PPM, see the Project Management User Guide.
The following diagram describes how an application user submits a timesheet.
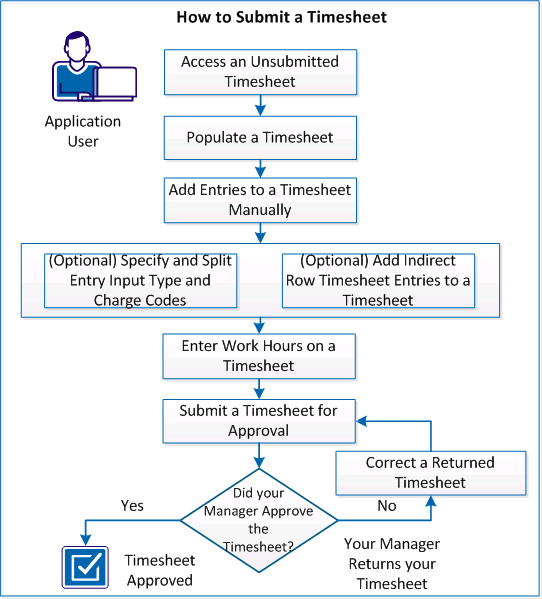
To submit a timesheet, perform these steps:
After your manager registers you as a user, you can start to work with CA Clarity PPM. To start tracking time with timesheets, access your unsubmitted timesheets.
Follow these steps:
The timesheets list page appears with the unsubmitted timesheets up to the current reporting period.
The timesheet page appears.
When you first open a timesheet, the timesheet is blank, containing no tasks. To prepopulate your current timesheet with tasks, click the Populate button on the timesheet page.
Note: Depending on how your CA Clarity PPM administrator sets up your timesheet options, prepopulating a timesheet does one of the following tasks:
After you populate your timesheet with tasks, you can add additional tasks from your project. To manually add additional tasks to a timesheet, use the add task feature.
Follow these steps:
A page opens with a list of tasks available to the user.
Your timesheet opens with the manually added tasks.
Input type and charge codes are used for payroll purposes. If your company uses these codes, your project manager can make them available to you in your timesheets. Your manager may also want you to split entries in this process. Verify the policy of your company on input type and charge codes before submitting your timesheets.
For more information about this topic, see the Project Management User Guide.
Follow these steps:
Note: This step is appropriate when your manager wants you to enter specific hours under two different charge codes. After you split the entry, you can select a type code or charge code from the Input Type Code or Charge Code field for the second entry.
Your manager may want you to add indirect rows to a timesheet under an indirect category. To fulfill the specific requirements of your company, add an indirect row timesheet entry to a timesheet.
Follow these steps:
A new entry is created.
To record the time you worked each day on specific task assignments, use the timesheet page of your current work period.
Note: You can also distribute the number of hours for a single task evenly across all working days, by entering the total number of hours you worked in the Total column for the time entry row. If you enter values in both the Date and Total cells, the Date cell value overrides the Total cell value.
To track the time you spend on tasks each week, enter work hours on a timesheet.
Follow these steps:
The timesheet page appears.
When you submit a timesheet, it goes to your manager for approval. The status of the timesheet is Unapproved until your manager approves it. To send a timesheet to your manager for approval, submit the timesheet.
Do one of the following:
When your manager returns a timesheet, you receive a notification. The method of this notification depends on your account settings. If your manager returns a timesheet to you to correct, use the following process to correct the timesheet.
Follow these steps:
Note: The returned timesheet may have notes from your manager about what to correct. The Paper and Pencil icons on the timesheet indicate if there are new notes. For more information about timesheet notes, see the Basics User Guide.
Your manager is notified that the corrected timesheet is ready for review and approval.
|
Copyright © 2013 CA.
All rights reserved.
|
|